Technique of Sketching
It is recommended to do sketches on a graph paper or section paper, as it facilitates the projecting connection. Sketches are done due to all rules for the detail drawing s of parts.
The following steps should be followed to make orthographic sketches.
Step I. Study the object carefully and decide the views which describe the shape of the object best. Note the symmetry of the object from drawing the centre lines. Forgetting the details note the length, width, height and their proportions.
Step II. Decide upon the views (sections) to be drawn and sketch the centre lines for them planning the proportions. A special attention is paid to the choice of the main view. It must give the complete picture of a form and sizes of a part taking into account technology of its making.
Step III. To choose a format in accordance with State Standard 2.301 - 68, to do title block. The size of a format is chosen according to complication and sizes of a part taking into account the possibility of the increase of a view in comparison with the nature for complicated and small parts and the decrease for simple in a shape and large parts.The sketch should not be too small otherwise it is not clear and dimensions cannot be placed on it.
Step IV. Draw the rectangles or squares in which the views are to be sketched and sketch the outline of every feature by firm lines. To draw axial lines. Mark the reference points to show lengths, widths, heights, curve lines, circles, etc.
Step V. Lightly sketch the object, drawing circles first and then horizontal, vertical and sloping straight lines in that order. Sketch in the required dotted lines for hidden features of the object. To draw the visible contour of a part by continuous lines, beginning with the basic geometrical forms and keeping the projection connection and proportion of elements of a part on all depictions (fig. 6.1, a).
Step VI. To draw the necessary sectional views, sections by thin lines (fig. 6.1, b). Finish all the lines of the views and rub out lines which are not required. To depict previously missed small elements: grooves, chamfers, fillets etc.
Step VII. To shade sectional views, sections. To mark sectional views, sections (fig. 6.1 c). Add the necessary dimensions and notes. To draw extension and dimension lines. The sizes of external elements are placed, as a rule, from the side of a view, and the sizes of internal – from the side of sectional view. Overall dimensions must be marked. To mark the roughness of surfaces, according to State Standard 2.309 – 73.
Step VIII.To delete unnecessary lines, point a sketch (fig. 6.1, d). To fill the title block and write down technical requirements. Column «Scale» in the title block for sketches is not filled in. Then have a final look to correct any inaccuracy or to add any omissions.
The example of the completed sketch is shown in figure 6.2.

Figure 6.1 – Technique of sketching
| |
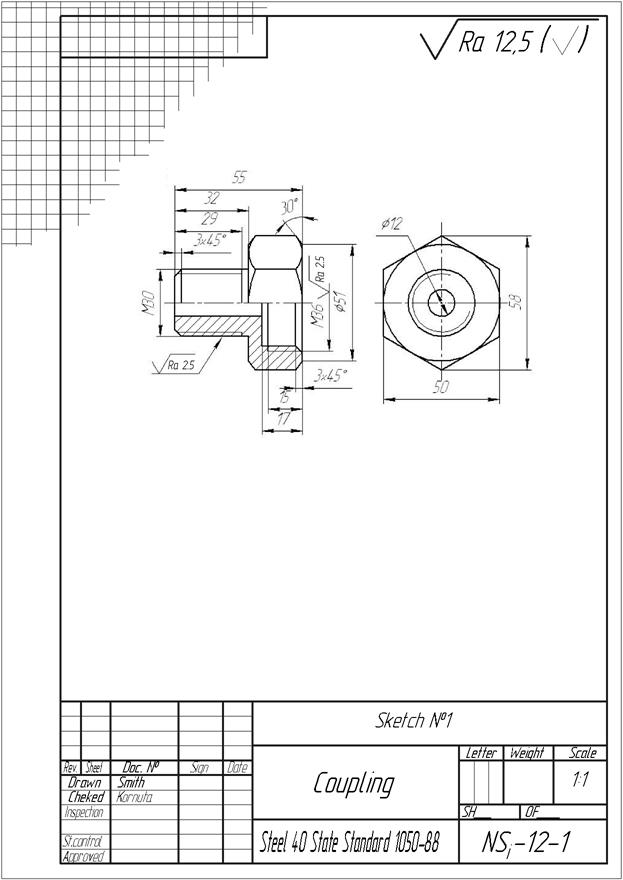
Figure 6.2 –The example of the sketch «Сoupling»
Дата добавления: 2016-07-18; просмотров: 1984;
Поиск по сайту
Узнать еще
Публикации по технике и механике
Публикации по биологии
Публикации по информатике

Публикации по строительству
Публикации по физике
Публикации по химии
Публикации по электронике

Публикации по искусству
Публикации по географии
Публикации по медицине