Определение источника данных для таблицы DataGridView
Таблица DataGridView может быть привязана к источнику данных.
Источник данных устанавливается свойством DataSource. Источниками могут быть:
● одномерный массив (Array, ArrayList, StringCollection и др.);
● компоненты, реализующие интерфейс IList или IListSource;
● обобщенные классы коллекций;
● DataTable;
● DataView;
● DataSet или DataViewManager.
Если элемент управления DataGridView привязан к данным с помощью нескольких связанных таблиц СУБД и в сетке разрешены переходы, в каждом ряду сетки отображаются расширители.
Расширитель позволяет переходить из главной таблицы в подчиненную. При щелчке узла отображается подчиненная таблица, а при нажатии кнопки возврата — исходная главная таблица. Таким образом, в сетке отображаются иерархические отношения между таблицами.
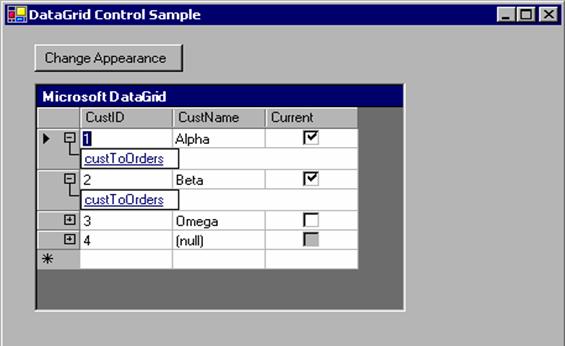
рис.13
Если установлено dataGridView1.AutoGenerateColumns = true; то после привязки таблицы к объекту столбцы и строки автоматически создаются, форматируются и заполняются.
После создания элемента управления DataGridView столбцы можно добавлять, удалять, упорядочивать и форматировать. Можно изменять заголовки столбцов и другие их свойства.
Когда в качестве источника используется массив, то ЭУ DataGridView ищет подходящие открытые свойства и создает из них столбцы и строки: имена свойств становятся именами столбцов, а значения свойств – значениями ячеек.
Свойство, возвращающее данное типа bool, порождает столбец типа DataGridViewCheckBoxColumn. Другие свойства, возвращающие значения типа string, int, float и т.д., отображаются в столбце типа DataGridViewTextBoxColumn.
Если свойство имеет аксессор set{}, то изменение значения в ячейке, соответствующей свойству, приводит к изменению источника (вызывается метод свойства get).
Чтобы открытое свойство не отображалось в таблице, необходимо перед ним определить атрибут [Browsable(false)].
Пример.
Источником данных таблицы выбран динамический массив, являющийся базовым классом для класса PersonList. Элементами массива являются экземпляры класса Person.
Так как определены get и set аксессоры свойств, можно изменять массив из таблицы.
Именами столбцов являются имена свойств.
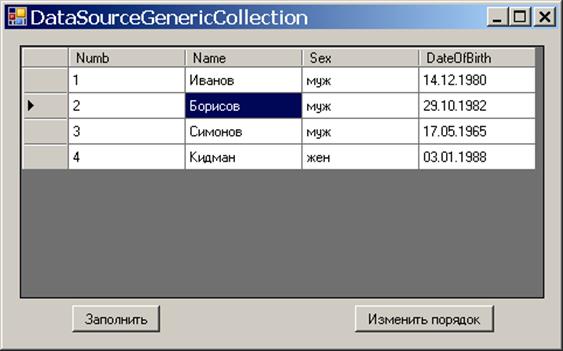
рис.14
using System;
using System.Collections.Generic;
using System.ComponentModel;
using System.Drawing;
using System.Text;
public class Person
{
private uint numb;
private string name;
private Sex sex;
private DateTime dateOfBirth;
static uint numbs = 0;
public Person( string name, Sex sex, DateTime dob )
{
this.name = name;
this.sex = sex;
this.dateOfBirth = dob;
numb = ++numbs;
}
// [Browsable(false)]
public uint Numb
{
get { return numb; }
}
public string Name
{
get { return name; }
set { name = value; }
}
public Sex Sex
{
get { return sex; }
set { sex = value; }
}
public DateTime DateOfBirth
{
get { return dateOfBirth; }
set { dateOfBirth = value; }
}
}
public enum Sex
{
муж,
жен
}
using System;
using System.Collections;
using System.Collections.Generic;
using System.ComponentModel;
using System.Data;
using System.Drawing;
using System.Text;
using System.Windows.Forms;
public partial class Form1 : Form
{
public Form1()
{
InitializeComponent();
}
ArrayList people;
private void Form1_Load(object sender, EventArgs e)
{
// создадим массив объектов типа Person
people = new ArrayList ();
people.Add (new Person("Иванов", Sex.муж, new DateTime(1980, 12, 14)));
people.Add(new Person("Борисов", Sex.муж, new DateTime(1982, 10, 29)));
people.Add (new Person("Симонов", Sex.муж, new DateTime(1965, 5, 17)));
people.Add (new Person("Кидман", Sex.жен, new DateTime(1988, 1, 3)));
}
private void getData_Click(object sender, EventArgs e)
{
dataGridView1.AutoGenerateColumns = true;
dataGridView1.DataSource = people;
// Изменить имя столбца
dataGridView1.Columns["Sex"].HeaderText = "Пол";
// установим последовательность столбцов в таблице
DataGridViewColumnCollection columns = dataGridView1.Columns;
columns[0].DisplayIndex = 2;
columns[1].DisplayIndex = 3;
columns[2].DisplayIndex = 0;
//другой способ выборки столбца (не путать Name со свойством таблицы)
dataGridView1.Columns["Name"].DisplayIndex = 1;
}
private void Изменить_порядок_Click(object sender, EventArgs e)
{
MessageBox.Show(((Person)people[1]).Name); // старое значение
((Person)people[1]).Name = "aaaaaaa"; // новое значение имени
// изменение значения в массиве находит отражение в таблице
// перестановка столбцов
dataGridView1.Columns["Numb"].DisplayIndex = 1;
dataGridView1.Columns["Name"].DisplayIndex = 0;
dataGridView1.Columns["Sex"].DisplayIndex = 3;
dataGridView1.Columns["DateOfBirth"].DisplayIndex = 2;
}
}
Изменение значения ячейки в таблице приводит к изменению соответствующего элемента в массиве.
Изменяем “Борисов” на “Антонов”.
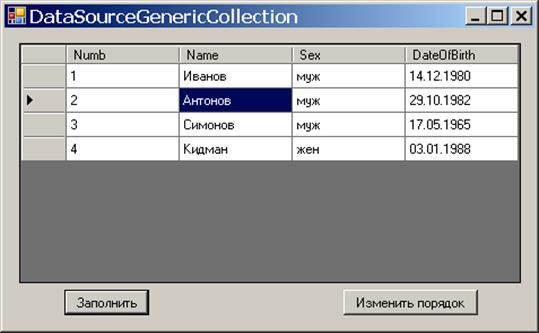
рис.15
Изменение элемента массива в программе
((Person)people[1]).Name = "aaaaaaa";
отображается в таблице.
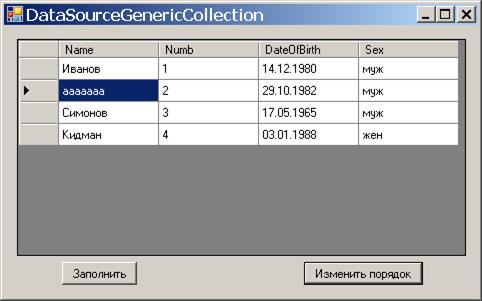
рис.16
Порядок следования столбцов не всегда соответствует порядку следования свойств массива.
Примеры изменения порядка следования столбцов:
dataGridView1.AutoGenerateColumns = true;
dataGridView1.DataSource = people;
Способ 1. Использование числового индекса
dataGridView1.Columns[3].DisplayIndex = 3;
DataGridViewColumnCollection columns = dataGridView1.Columns;
columns[0].DisplayIndex = 2;
columns[1].DisplayIndex = 1;
columns[2].DisplayIndex = 0;
Способ 2. Использование имени столбца в качестве индекса
dataGridView1.Columns["Numb"].DisplayIndex = 1;
dataGridView1.Columns["Name"].DisplayIndex = 0;
dataGridView1.Columns["Sex"].DisplayIndex = 3;
dataGridView1.Columns["DateOfBirth"].DisplayIndex = 2;
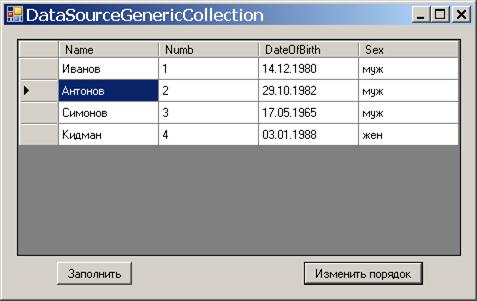
рис.17
Определение источника данных для столбца типа DataGridViewComboBoxColumn
Комбинированный список является общим для всех ячеек столбца DataGridViewComboBoxColumn. Поэтому в качестве источника данных для такого столбца может использоваться массив объектов. Имя массива необходимо указать в свойстве DataSource столбца DataGridViewComboBoxColumn.
Если объект массива содержит несколько открытых свойств, то необходимо в DisplayMember указать, какое свойство является отображаемым, а в ValueMember - какое свойство возвращает значение в программу. Свойство DataPropertyName указывает имя свойства в источнике данных таблицы, которое является индексом в списке.
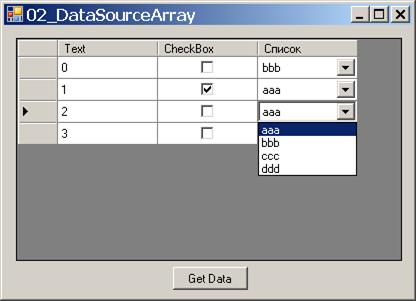
рис.18
/* Пример определения источника данных для таблицы.
* Столбцы строятся автоматически.
*/
using System;
using System.Collections.Generic;
using System.ComponentModel;
using System.Data;
using System.Drawing;
using System.Text;
using System.Windows.Forms;
using System.Collections;
public partial class Form1 : Form
{
public Form1()
{
InitializeComponent();
}
Item[] items;
private void getData_Click(object sender, EventArgs e)
{
// создать источник данных для таблицы
items = new Item[4];
items[0] = new Item(0, false);
items[1] = new Item(1, true);
items[2] = new Item(2, false);
items[3] = new Item(3, false);
// создать массив для списка
ArrayList arl = new ArrayList();
arl.Add (new ItemComboBox("aaa",0));
arl.Add (new ItemComboBox("bbb",1));
arl.Add (new ItemComboBox("ccc", 2));
arl.Add (new ItemComboBox("ddd",3));
dataGridView1.AutoGenerateColumns = true;
dataGridView1.DataSource = items;
dataGridView1.Columns["Boolean"].HeaderText = "CheckBox";
{ // создание столбца – комбинированного списка
DataGridViewComboBoxColumn cbс = new
DataGridViewComboBoxColumn();
cbс.HeaderText = "Список";
cbс.DataSource = arl; // массив в качестве источника
cbс.DisplayMember = "TextCBox"; //из ItemComboBox !
cbс.ValueMember = "Value"; //из ItemComboBox !
//cbс.DataPropertyName = "TextBox"; //из Item !
// добавить комб. список к коллекции столбцов
dataGridView1.Columns.Add(cbс);
}
protected class Item
{
private int textBox;
private bool bolean;
public Item(int textBox, bool bolean)
{
this.textBox = textBox;
this.bolean = bolean;
}
public int TextBox
{ get { return textBox; } }
public bool Boolean
{ get { return bolean; } }
}
protected class ItemComboBox
{
private string textCBox;
private int value;
public ItemComboBox(string textCBox, int value)
{
this.textCBox = textCBox;
this.value = value;
}
public string TextCBox
{ get { return textCBox; } }
public int Value
{ get { return value; } }
}
}
The DataGridViewComboBoxColumn class is a specialized type of DataGridViewColumn used to logically host cells that enable selection and editing. A DataGridViewComboBoxColumn has an associated DataGridViewComboBoxCell in every DataGridViewRow that intersects it.
The following steps describe a common way to use this class:
Create a DataGridView.
Set the DataSource property of the DataGridView.
Create a DataGridViewComboBoxColumn.
If the data source contains multiple properties or columns, set the DataPropertyName property to the name of the property or column for populating the cell values.
DataPropertyName - gets or sets the name of the data source property or database column to which the DataGridViewColumn is bound.
Use the DataSource or Items properties to establish the selections.
Use the ValueMember and DisplayMember properties to establish a mapping between cell values and what will be displayed on the screen.
The DataGridViewComboBoxColumn will only work properly if there is a mapping between all its cell values that are populated by the DataGridView.DataSource property and the range of choices populated either by the DataSource property or the Items property. If this mapping doesn't exist, the message "An Error happened Formatting, Display" will appear when the column is in view.
The default sort mode for this column type is NotSortable.
Notes to Inheritors When you derive from DataGridViewComboBoxColumn and add new properties to the derived class, be sure to override the Clone method to copy the new properties during cloning operations. You should also call the base class's Clone method so that the properties of the base class are copied to the new cell.
Дополнительные примеры:
 Example
The following code example demonstrates how to create an unbound DataGridView; set the ColumnHeadersVisible, ColumnHeadersDefaultCellStyle, and ColumnCount properties; and use the Rows and Columns properties. It also demonstrates how to use a version of the AutoResizeColumnHeadersHeight and AutoResizeRows methods to properly size the column headers and the rows. To run this example, paste the following code into a form that contains a DataGridView named dataGridView1 and a button named Button1, and then call the InitializeDataGridView method from the form's constructor or Load event handler. Ensure all events are connected with their event handlers.
private void InitializeDataGridView()
{
// Create an unbound DataGridView by declaring a column count.
dataGridView1.ColumnCount = 4;
dataGridView1.ColumnHeadersVisible = true;
// Set the column header style.
DataGridViewCellStyle columnHeaderStyle = new DataGridViewCellStyle();
columnHeaderStyle.BackColor = Color.Beige;
columnHeaderStyle.Font = new Font("Verdana", 10, FontStyle.Bold);
dataGridView1.ColumnHeadersDefaultCellStyle = columnHeaderStyle;
// Set the column header names.
dataGridView1.Columns[0].Name = "Recipe";
dataGridView1.Columns[1].Name = "Category";
dataGridView1.Columns[2].Name = "Main Ingredients";
dataGridView1.Columns[3].Name = "Rating";
// Populate the rows.
string[] row1 = new string[] { "Meatloaf", "Main Dish", "ground beef",
"**" };
string[] row2 = new string[] { "Key Lime Pie", "Dessert",
"lime juice, evaporated milk", "****" };
string[] row3 = new string[] { "Orange-Salsa Pork Chops", "Main Dish",
"pork chops, salsa, orange juice", "****" };
string[] row4 = new string[] { "Black Bean and Rice Salad", "Salad",
"black beans, brown rice", "****" };
string[] row5 = new string[] { "Chocolate Cheesecake", "Dessert",
"cream cheese", "***" };
string[] row6 = new string[] { "Black Bean Dip", "Appetizer",
"black beans, sour cream", "***" };
object[] rows = new object[] { row1, row2, row3, row4, row5, row6 };
foreach (string[] rowArray in rows)
{
dataGridView1.Rows.Add(rowArray);
}
}
private void button1_Click(object sender, System.EventArgs e)
{
// Resize the height of the column headers.
dataGridView1.AutoResizeColumnHeadersHeight();
// Resize all the row heights to fit the contents of all non-header cells.
dataGridView1.AutoResizeRows(
DataGridViewAutoSizeRowsMode.AllCellsExceptHeaders);
}
private void InitializeContextMenu()
{
// Create the menu item.
ToolStripMenuItem getRecipe = new ToolStripMenuItem("Search for recipe", null,
new System.EventHandler(ShortcutMenuClick));
// Add the menu item to the shortcut menu.
ContextMenuStrip recipeMenu = new ContextMenuStrip();
recipeMenu.Items.Add(getRecipe);
// Set the shortcut menu for the first column.
dataGridView1.Columns[0].ContextMenuStrip = recipeMenu;
dataGridView1.MouseDown += new MouseEventHandler(dataGridView1_MouseDown);
}
private DataGridViewCell clickedCell;
private void dataGridView1_MouseDown(object sender, MouseEventArgs e)
{
// If the user right-clicks a cell, store it for use by the shortcut menu.
if (e.Button == MouseButtons.Right)
{
DataGridView.HitTestInfo hit = dataGridView1.HitTest(e.X, e.Y);
if (hit.Type == DataGridViewHitTestType.Cell)
{
clickedCell =
dataGridView1.Rows[hit.RowIndex].Cells[hit.ColumnIndex];
}
}
}
private void ShortcutMenuClick(object sender, System.EventArgs e)
{
if (clickedCell != null)
{
//Retrieve the recipe name.
string recipeName = (string)clickedCell.Value;
//Search for the recipe.
System.Diagnostics.Process.Start(
"http://search.msn.com/results.aspx?q=" + recipeName);
//null);
}
}
Дата добавления: 2019-02-08; просмотров: 2635;
Поиск по сайту
Узнать еще
- Andantino con moto А. Бородин. Для берегов отчизны дальней
- DataGridView - СЕТКА
- I тип реакций. Реакции, характерные для органических кислот.
- I. 5. Тесты для контроля знаний раздела I
- I. Определение и структура методов обучения.
- I. Определение условий выполнения рукописи.
- I. Определение, виды радиоактивности, радиоактивные семейства
- II раздел. Организация работы логопеда в группе для детей с ОНР

Публикации по технике и механике
Публикации по биологии
Публикации по информатике

Публикации по строительству
Публикации по физике
Публикации по химии
Публикации по электронике

Публикации по искусству

Публикации по географии
Публикации по медицине