SQUARE NON-STANDARD THREAD
The profile of a square non-standard thread (fig.4.12) is rectangular or square. The thread doesn’t have a conventional denotation, that is why all sizes of the thread (fig. 4.13) are marked on the drawing. It is used as a leading thread (for example, in jacks etc.)
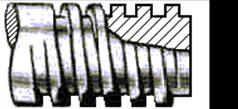
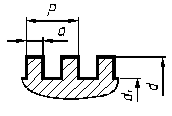
Figure 4.12 - Profile of a square non-standard thread
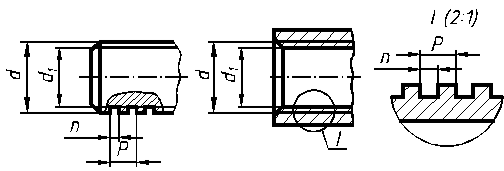
Figure 4.13 - The conventional drawing of a square non-standard thread
.
SPECIAL THREAD
Special threads are threads with a standard profile that differ from standard threads in diameters or pitches, as well as thread with a non-standard profile (for example, a thread with a rectangular or a round profile). For the special thread with a standard profile write down the letters Sp before conventional denotation (for example, Sp M60x5-6g, where 5 is non-standard pitch). The dimensions of all of thread parameters fill in on a drawing for threads with a non-standard profile.
FIXINGS
The thread fixing are bolts, screws, studs and nuts. The form and sizes of fixings are regulated by the current standards.
As a rule, working drawing of the standardized fixings is not done and fixings are ordered on the basis of the conventional standard denotation. The conventional denotation of fixings consists of: the name of fixing, the instructions about the accuracy and the variant of implementation; the standard denotation of a metrical thread; the strength grade of a fixing material; the thickness of the corrosion resistant coating; the design standard.
Unscrew-thread fixings (washers, cotter-pins and other) are widely used in fixed thread joints. The most widespread designs of these fixings are also standardized, and they have conventional signs.
BOLTS
A bolt and nut comprises what is known as a screw pair. Such a pair is used for fastening together parts used in engineering construction. The parts can be separated. by screwing off the nut, the fastening is said to be temporary.
A bolt consists of two parts: a shank and a head. The shank is cylindrical and is threaded at the tail end for a sufficient length so as to effectively engage with a nut. The shape of the head depends upon the purpose for which the bolt is required. While considering the length of the bolt, the thickness of the head is not taken into account.
The most widespread construction of a bolt is hexagonal headed bolt. Bolts are made with normal, high and low accuracy.
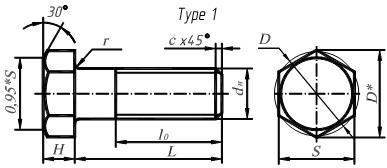
Figure 4.14 – Hexagonal headed bolt (type 1)
Example of conventional denotation of a bolt of normal accuracy, type 1, with the diameter of a thread 20 mm, a fine pitch 2 mm, by the tolerance zone 6g, a working length 100 mm, a strength class 5.8, without coverage according to State Standard 7798:2008:
BOLT M20´2-6g ´100.58State Standard7798:2008.
Bolts of types 2 and 3 are used for the connection of machines parts which are vibrating. It results in unscrewing of nuts and bolts. In fig. 4.15 the bolt of type 2 is shown - with opening for a split-pin and type 3 - with two openings in the head of bolt for wired connection of bolts group.

Figure 4.15 – Hexagonal headed bolt (type 2 and type 3)
Three verges of hexahedrons are shown on the front view of bolts and nuts. The drawings of a nut and a head of the bolt are started from the construction of the correct inscribed hexagon. The stage-by-stage construction of crossing lines of verges of a bolt head with the conical surface of chamfer on its face is shown in fig.4.16. At such construction the hyperbolical curves of crossing are simply drawn by the arcs of circles.

1 step 2 step 3 step
Figure 4.16 – The stage-by-stage construction of hexagonal headed bolt
Table 4.3 - The basic bolt sizes of normal accuracy are resulted in table 4.3.
| Nominal thread diameter dn , mm | Pitch of a thread | S | H | D* | R no more | D not less | l0 | c | |
| coarse | fine | ||||||||
| 2.0 | 1.5 | 27.7 | 1.2 | 26.5 | |||||
| 2.5 | 1.5 | 31.2 | 1.6 | 29.9 | 2.5 | ||||
| 2.5 | 1.5 | 34.6 | 2.2 | 33.3 | 2.5 | ||||
| 2.5 | 1.5 | 37.0 | 2.2 | 35.0 | 2.5 | ||||
| 3.0 | 2.0 | 41.6 | 2.2 | 39.6 |
The parameter D* determines the reference diameter of a circle described round a hexagon, and the parameter of D regulates actual low-limit size hexagon diagonal for the real roller stock.
NUTS
Nuts are generally made in the form of hexagonal or square prism. Besides this, cylindrical and other forms are also used to suit the particular requirements. They have internal threads and hold the part by giving the tightening effect on the bolt.
The form of the external surface, the type of execution and the accuracy of manufacturing are determined for the standardized nuts. Three types of a nut are shown in fig.4.17. A metrical thread with coarse and fine pitches is used in standard nuts. Standard hexahedral nuts of different height are widely used.

Figure 4.17 – Hexagonal nut.
The example of the conventional denotation of a nut (type 1), normal accuracy with the diameter of a metrical thread 12 mm, a coarse pitch, tolerance zone 7Н, the strength class 5 and the coverage 02 (cadmium with chromating) 9 mkm thick:
Дата добавления: 2016-07-18; просмотров: 1827;

